
Wall sconces are the unsung heroes of living room lighting. They free up floor and table space, soften the harsh overhead glare, and add a layer of warmth that a single ceiling fixture simply can’t deliver on its own. Whether someone is renovating a 1920s bungalow or refreshing a builder-grade rental, sconces offer a smart way to layer light at eye level. This guide walks through styles, placement, wiring options, bulbs, and installation tips so homeowners can plan a project that looks intentional and works the way it should.
Table of Contents
ToggleKey Takeaways
- Living room wall sconce lighting creates a functional mid-level illumination layer that reduces glare, saves floor space, and pairs naturally with ceiling lights and floor lamps for a complete three-layer lighting strategy.
- Mount wall sconces at 60 to 72 inches from the floor (higher in 9–10-foot ceilings) and space them 6 to 10 inches beyond furniture edges to prevent glare while maintaining visual balance and proportionality.
- Choose sconces based on function first (task, ambiance, or accent), then match style to your decor—modern clean lines, traditional candle styles, or transitional designs that age well in any home.
- Select LED bulbs in the 400–800 lumen range with warm white color temperature (2700K–3000K) and a CRI above 90 for accurate colors, and ensure your dimmer is LED-compatible to avoid flickering.
- Hardwired sconces require electrical permits and a voltage tester for safety, while plug-in and battery-operated options suit renters and spaces where wiring isn’t practical.
- Always dry-fit fixtures with painter’s tape before drilling, confirm power is off with a voltage tester, and hire an electrician if you’re unsure—the cost is far less than safety risks or insurance claims.
Why Wall Sconces Belong in Every Modern Living Room
Living rooms ask a lot of their lighting. They need to handle movie nights, conversation, reading, and the occasional assignments session, often within the same hour. A single overhead fixture rarely covers all of that gracefully.
Sconces fix this by adding mid-level illumination, the layer between ceiling lights and table lamps. They pull light off the floor, draw the eye upward, and create flattering shadows on walls and faces. They also rescue rooms with limited surface area, where another lamp simply won’t fit.
For anyone already planning LED living room upgrades, sconces pair naturally with recessed cans and floor lamps to round out a three-layer lighting plan.
Choosing the Right Sconce Style for Your Space
Sconce styles fall into a few broad camps: uplights (which wash the ceiling), downlights (which spotlight a chair or artwork), swing-arm (adjustable for reading), and flush decorative (purely ambient). The first question isn’t aesthetic, it’s functional. Will the sconce light a task, frame a sofa, or simply add glow?
Once that’s settled, scale matters. A 6-inch sconce on a 12-foot wall looks like an afterthought. A general rule: the fixture’s height should equal roughly one-quarter to one-third of the available wall space above eye level.
Matching Sconces to Your Decor: Modern, Traditional, and Transitional
- Modern: Clean lines, matte black or brushed brass, linear LED bars, and integrated diffusers. Think geometric shapes and minimal hardware.
- Traditional: Candle-style sconces with fabric shades, antique brass, or aged bronze finishes. They pair well with crown molding and wainscoting.
- Transitional: The safest bet for most homes. A simple metal arm with a drum or globe shade bridges old and new. Design blogs like Home Bunch regularly feature transitional sconces in new-construction homes because they age well.
For sustainability-minded homeowners, bamboo sconce options bring natural warmth that complements both mid-century and coastal interiors.
Placement and Height Rules That Actually Work
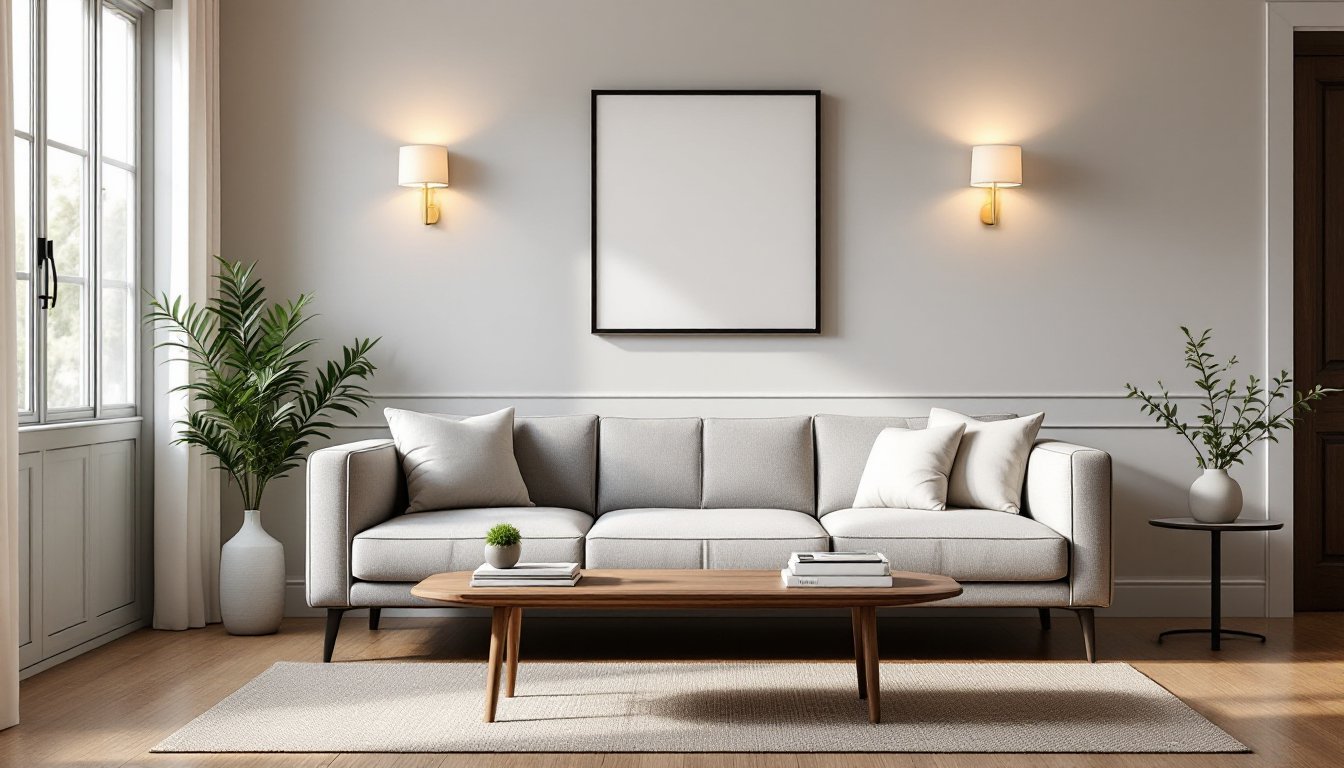
Standard practice puts sconces 60 to 72 inches off the finished floor, measured to the center of the fixture. That keeps the bulb just above average eye level, which prevents glare for anyone standing or sitting.
A few practical guidelines:
- Flanking a sofa or fireplace: Space sconces 6 to 10 inches beyond each end of the furniture, mounted at the same height.
- As a pair on one wall: Keep them 6 to 8 feet apart for balanced light pools.
- Above artwork: Mount 6 to 12 inches above the frame, angled downward.
Ceiling height changes the math. In rooms with 9- or 10-foot ceilings, bump sconces up to 70 to 78 inches so they read proportionally. And always dry-fit the fixture, painter’s tape on the wall works wonders, before drilling anything.
Hardwired vs. Plug-In vs. Battery-Operated Sconces
There are three main wiring paths, and each has trade-offs:
- Hardwired: Cleanest look, controlled by a wall switch, but requires running cable inside the wall. In most jurisdictions, this falls under the National Electrical Code (NEC) and may require a permit or licensed electrician, especially if a new circuit or switch is involved. Codes vary, so checking locally is non-negotiable.
- Plug-in: No electrical work needed. The cord either drapes decoratively or hides behind a cord cover. These are ideal for renters, and there’s a solid shopping guide to plug-in sconces that highlights designer-friendly options with fabric-wrapped cords.
- Battery-operated: Usually rechargeable LED pucks or candles with magnetic backplates. Light output is limited, but they’re perfect for awkward spots where wiring isn’t practical.
For apartment dwellers, small-space resources like Apartment Therapy cover creative plug-in installations that don’t violate leases.
Bulb Selection, Brightness, and Color Temperature Tips
Bulb choice can make or break a sconce. For ambient living room sconces, 400 to 800 lumens per fixture is the sweet spot, enough to feel present without overpowering other lighting.
Color temperature matters just as much:
- 2700K (warm white): Cozy, lamp-like glow. Best for evening rooms.
- 3000K (soft white): Slightly crisper, works with cooler paint colors.
- 3500K and above: Too clinical for most living rooms, save it for kitchens and baths.
Look for bulbs with a CRI (Color Rendering Index) of 90 or higher so skin tones and fabrics read accurately. Dimmable LEDs are worth the small premium, but the dimmer switch must be LED-compatible, otherwise expect flickering and buzz. The same principles apply when planning cozy bedroom lighting, where warm temperatures dominate.
DIY Installation Steps and Common Mistakes to Avoid
Installing a hardwired sconce is achievable for a confident DIYer, provided the existing electrical box is in place. Adding a new box from scratch is a different project entirely and often requires a pro.
Tools and materials:
- Voltage tester (non-negotiable)
- Wire stripper, screwdriver, drill
- Wire nuts and electrical tape
- Stud finder
- Safety glasses and work gloves
Basic steps:
- Cut power at the breaker. Confirm with a voltage tester at the box, not just the switch.
- Remove the old fixture or knockout plate, exposing the existing wires.
- Attach the mounting bracket to the electrical box using the supplied screws.
- Connect wires: black to black (hot), white to white (neutral), and ground to ground (green or bare copper). Twist with wire nuts and wrap with tape.
- Tuck wires back, secure the sconce body, install the bulb, and restore power.
Common mistakes:
- Skipping the voltage test. A tripped breaker isn’t proof of a dead circuit.
- Overloading an old electrical box not rated for the fixture’s weight.
- Forgetting that some sconces require a specific orientation for the canopy to sit flush.
- Mismatched dimmers causing LED flicker.
For broader fixture context, overhead lighting fixtures and angled recessed installations follow many of the same wiring principles, so skills transfer between projects.
When in doubt, hire an electrician. A two-hour service call is cheaper than an insurance claim.
Final Thoughts
Living room wall sconces aren’t just decor, they’re a functional upgrade that solves real lighting problems. Picking the right style, mounting at the correct height, choosing the right bulbs, and wiring safely turns a quick project into a years-long improvement. Start with one pair flanking the sofa, see how the room transforms, and build the rest of the lighting plan from there.


