
Angled recessed lighting is one of those upgrades that transforms how a room feels without major renovation work. Unlike standard downlights that point straight down, angled recessed fixtures direct light at 15°, 30°, or 45° angles, letting you highlight architectural features, artwork, or task areas with precision. Whether you’re updating a kitchen, accent wall, or display shelving, angled fixtures give you control that flat lighting just can’t match. This guide walks you through the essentials, what these lights are, how to choose angles and placement, and how to install them yourself if the wiring and rough-in are already in place.
Table of Contents
ToggleKey Takeaways
- Angled recessed lighting directs light at 15°, 30°, or 45° angles to highlight architectural features and artwork with precision control that standard downlights cannot match.
- The primary benefits of angled recessed lighting include accent lighting for walls and artwork, task lighting for kitchens and workspaces, and reduced shadows in narrow hallways and closets without requiring multiple light sources.
- A 45° angle creates dramatic grazing effects for textured walls, while 30° offers softer accent light and 15° provides subtle supplementary lighting depending on your design goals.
- Installing angled recessed lighting into existing rough-in boxes is moderate DIY work, but adding new circuits requires a licensed electrician in most jurisdictions for safety and code compliance.
- Angled recessed fixtures work best with larger 6-inch apertures to avoid beam vignetting, and should be positioned 18 to 24 inches from accent walls or 12 to 18 inches above task surfaces for optimal effect.
- Maintenance involves cleaning the fixture exterior every 3 to 6 months, ensuring bulb compatibility with dimmers, and checking for loose connections if flickering occurs.
What Is Angled Recessed Lighting?
Angled recessed lights sit flush in the ceiling or wall but are mounted on a gimbal or adjustable ring that lets you tilt the fixture in multiple directions. The standard angles are 15°, 30°, and 45°, with 45° offering the most dramatic directional control. This is different from a standard recessed fixture (called a downlight), which is fixed perpendicular to the ceiling and spreads light in a cone straight down.
The key advantage is flexibility. Once installed, you can rotate and tilt the bulb inside the fixture without reopening the ceiling. Most angled recessed trims come with trim rings in finishes like matte black, brushed nickel, or white to blend with your décor. Because you’re angling the light beam, you’ll need larger apertures (4 inches or 6 inches are common) to avoid the beam from being restricted by the fixture housing.
Benefits of Angled Recessed Lighting for Your Home
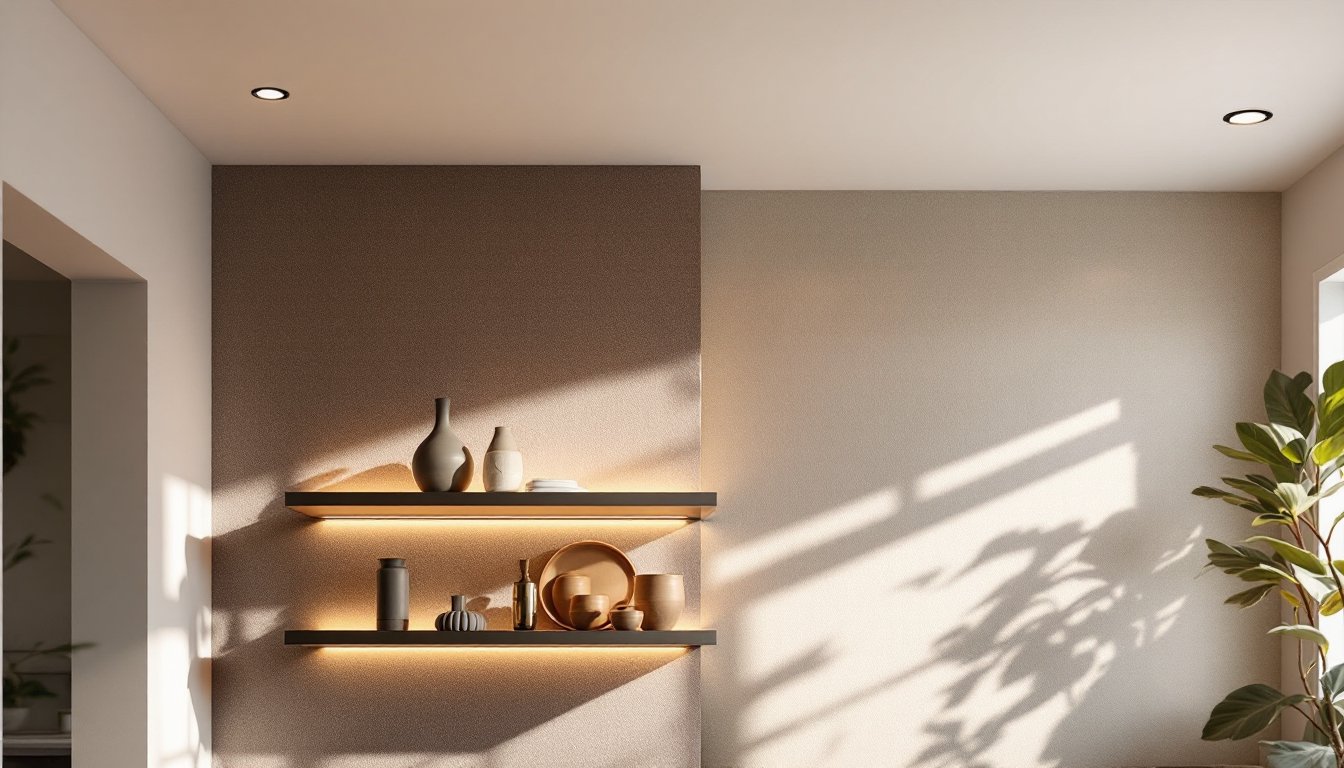
Accent lighting is the primary win. Angled fixtures let you highlight a textured wall, a piece of art, or floating shelves without spilling excess light onto adjacent surfaces. This creates depth and visual interest that overhead lighting alone can’t achieve.
Task lighting is another strong use case. In kitchens, an angled fixture aimed at the countertop or island provides focused work light without the glare and harsh shadows that come from straight-down illumination. The same applies in bathrooms over vanities or in home offices over desks.
Scalability matters too. Unlike pendant lights or track lighting (which require visible mounting hardware and structural adjustments), angled recessed lights integrate seamlessly into existing ceiling lines. If you already have recessed lighting rough-in boxes in the ceiling, upgrading to angled trims is a straightforward swap.
Finally, angled fixtures reduce the need for multiple light sources in small spaces. A single 45° angled light in a narrow hallway or closet can distribute light more evenly than a centered downlight, cutting shadows and dead zones.
Choosing the Right Angle and Placement
Start with your goal. If you’re accenting a wall texture or artwork, a 45° angle gives the most dramatic grazing effect, light rakes across the surface and emphasizes contours. For softer accent light on shelves or a feature wall, 30° is a safe middle ground. Reserve 15° for subtle supplementary light or situations where you want minimal angle without losing the directional effect.
Consider aperture size too. Larger apertures (6 inches) work best for angled fixtures because they allow the tilted beam to spread without vignetting (dark edges). If your rough-in boxes are 4-inch, you’ll get a tighter, more controlled beam.
Placement spacing follows the same logic as downlights but with angled intent. If you’re accenting a wall, position fixtures 18 to 24 inches away from that wall at a height where the angle creates the effect you want. For task lighting over a counter, center the fixture 12 to 18 inches above the work surface. Test placement with a flashlight or smartphone light app before cutting into drywall if you’re adding new rough-in boxes.
Always measure twice and mark carefully. Rough-in boxes are typically 3.5 inches deep for standard ceilings (check your box specs). Mark stud locations with a stud finder to avoid hitting framing when drilling.
Installation Basics for DIY Enthusiasts
If you’re installing angled fixtures into existing rough-in boxes, the job is straightforward. If you’re adding new boxes, you’ll need to open the ceiling, run wiring (a task best left to a licensed electrician if you’re unsure about local NEC (National Electrical Code) rules), and secure the box to a joist.
Difficulty level: Retrofitting into existing boxes is moderate DIY work. Adding new circuits requires a licensed electrician in most jurisdictions (check your local building code).
Start by turning off power at the breaker and testing with a non-contact voltage tester to confirm the circuit is dead.
If upgrading existing fixtures:
- Remove the old trim ring and bulb from the recessed housing.
- Disconnect any wiring if needed (most newer fixtures have push-to-connect terminals: older ones may have wire nuts).
- Insert the new angled gimbal and trim ring into the housing, following the manufacturer’s instructions for alignment.
- Lock the trim ring in place and install the bulb.
- Test the angle and adjust the gimbal to your desired tilt.
When running new circuits, use 14-gauge wire for 15-amp circuits and 12-gauge for 20-amp circuits (standard residential). If combining angled lights with a dimmer, ensure your LED or halogen bulbs are dimmable, not all are.
Tools and Materials You’ll Need
Tools:
- Non-contact voltage tester (essential for safety)
- Screwdrivers (Phillips and flathead)
- Drywall saw or hole saw (if opening ceiling)
- Stud finder
- Measuring tape
- Level
- Wire strippers and needle-nose pliers (if rewiring)
Materials:
- Angled recessed trim kit (includes gimbal, trim ring, and spring clips)
- Compatible bulbs (check wattage and base type: E26 screw base is standard: confirm dimmable if using a dimmer)
- Wire nuts or push connectors (if disconnecting old fixtures)
- Rough-in boxes (if adding new circuits)
- Electrical wire and conduit (if running new circuits, hire a licensed electrician)
- Drywall patch compound and tape (if patching old fixture holes)
Safety gear:
- Safety glasses
- Gloves (work gloves for handling drywall and fixtures: nitrile if handling wiring)
- Dust mask or respirator (when cutting drywall)
Design Ideas and Room Applications
Kitchens and islands benefit enormously from angled recessed lights. Aim a 30° or 45° fixture down and forward from the ceiling onto the countertop or island surface, eliminating shadows where you prep food. Pair angled accent lights with recessed downlights for ambient fill.
In living rooms, angled fixtures over floating shelves or a textured accent wall create a gallery-like effect. Position them 18 inches from the wall, angled to graze the surface. This draws the eye and adds layered ambiance without needing a separate track light system.
Bathrooms gain function when angled fixtures flank the vanity mirror. Instead of a centered downlight that casts shadows under the brow, two 30° fixtures flanking the mirror deliver even, directional light for grooming tasks.
For hallways and closets, a single angled fixture positioned off-center and tilted to spread light across the full width reduces shadows and dead zones, something a centered downlight struggles with in narrow spaces.
Assignments or craft areas in bedrooms benefit from an angled fixture aimed at the desk or table, providing task light without the glare of a direct overhead source. The angled beam lets you keep ambient ceiling light separate, giving you two-level control with a single dimmer.
Maintenance Tips and Troubleshooting
Dust and debris accumulate in recessed fixtures over time, especially in kitchens where cooking oils settle. Turn off the circuit, wait for the fixture to cool, and wipe the exterior trim and lens with a microfiber cloth every 3 to 6 months. For deeper cleaning, carefully remove the trim ring (check the manufacturer’s locking mechanism) and clean the inner reflector if accessible.
Flickering or dimming usually signals a loose connection or a bulb reaching end-of-life. Ensure the bulb is fully seated in the socket, and try a known-good replacement. If flickering persists, turn off the circuit and recheck wire connections at the junction box (use a licensed electrician if you’re uncomfortable opening the box).
Bulb compatibility is crucial, especially with dimmers. An LED bulb that works fine on a standard circuit may flicker on a dimmer if it’s not rated dimmable. Check the bulb packaging, it should say “dimmable” if you’re running it through a dimmer switch.
Angle adjustment should be smooth and consistent. If a gimbal feels stiff, apply a tiny bit of silicone-based lubricant to the pivot point. Never force the gimbal: excessive pressure can crack the housing.
Thermal issues can reduce bulb lifespan in overly insulated ceilings. Recessed lights in attic spaces need proper air sealing and thermal barriers to prevent heat buildup. If your ceiling is heavily insulated, use fixtures rated IC (insulation contact) and ensure adequate clearance above the rough-in box as specified by the manufacturer.
For professional guidance on complex wiring, energy code compliance, or structural concerns, consult a licensed electrician or check resources like This Old House for remodeling tutorials. If choosing specific fixture brands, review recommendations at sources like Bob Vila’s recessed lighting guide for coverage and performance comparisons. Those considering advanced construction techniques should explore Fine Homebuilding for detailed framing and building science guidance.
When planning angled recessed layouts, explore living room recessed lighting layouts and where to place recessed lighting for proven spacing and room-specific applications.


