
Motion sensor outdoor lighting has become standard for modern homes, not just a convenience, but a practical layer of security and energy savings. Whether you’re lighting a dark entry path or deterring unwanted foot traffic around your property, motion-activated lights respond to movement rather than staying on all night. They’re more affordable and accessible than ever, and they integrate with smart home systems if you want them to. This guide walks you through the types available, where to place them, and how to install and maintain them without hiring a contractor.
Table of Contents
ToggleKey Takeaways
- Motion sensor outdoor lighting cuts electricity use dramatically compared to always-on fixtures and is one of the cheapest, most effective home security deterrents available.
- Passive infrared (PIR) sensors are affordable and reliable for most climates, while microwave sensors work better in extreme weather but cost more and may trigger on nearby movement.
- Proper placement at entry points 6–8 feet high with staggered coverage along driveways prevents dark zones and false triggers caused by sensors detecting their own fixture’s reflection.
- Hardwired installation requires a dedicated 15-amp outdoor circuit with proper GFCI protection; hiring a licensed electrician costs $200–400 but ensures safety and code compliance.
- Regular sensor maintenance—cleaning the lens every 2–3 months and adjusting sensitivity settings—prevents false triggers and extends the fixture’s lifespan significantly.
- Smart WiFi-enabled motion sensor lights cost 2–3 times more than standard sensors but enable remote scheduling, notifications, and integration with smart home systems like Alexa and Google Home.
Why Motion Sensor Outdoor Lights Are Essential for Modern Homes
Motion sensor lighting solves a real problem: outdoor spaces that would otherwise sit dark and unused, or stay lit all night wasting energy. A light that turns on only when movement is detected cuts electricity use dramatically compared to always-on fixtures. Most homeowners notice a measurable drop in their utility bills within the first month of installation.
Security is the other big driver. Well-placed motion lights deter trespassers and make your home’s perimeter visible to neighbors and passing traffic. They also eliminate the fumbling-for-keys moment when you arrive home at dusk. Studies on home security consistently show that motion-activated lighting is one of the cheapest, most effective deterrents, second only to landscaping that removes hiding spots.
Modern sensors are far more reliable than older models. False triggers from leaves, insects, or reflected light are less common now, especially with microwave and dual-sensor technology. You get fewer phantom activations that annoy you or neighbors, and more consistent performance across seasons and weather conditions.
Types of Motion Sensor Outdoor Lighting Systems
Understanding the sensor type is crucial because it determines how the light behaves, its range, and its susceptibility to false triggers.
Passive Infrared and Microwave Sensors
Passive infrared (PIR) sensors detect heat emitted by moving objects, a person, animal, or vehicle. They’re the most common type, affordable, and very reliable in temperate climates. PIR sensors work best in clear line-of-sight situations and have adjustable range settings, typically 15–40 feet. The catch: they perform poorly in extreme heat (like full afternoon sun on a metal shed) or extreme cold, because the sensor struggles to detect a temperature differential.
Microwave sensors emit microwave pulses and detect reflections when something moves into the beam. They’re faster to trigger than PIR and work in nearly any weather, including heavy rain or fog. They also penetrate through light materials (drywall, plastic, thin wood), which can sometimes be a problem if your sensor is mounted near a neighbor’s property and triggers on their movement. Microwave sensors are pricier than PIR but rarely give false triggers from insects or blown debris.
Dual-sensor options combine both technologies, triggering only when both PIR and microwave detect movement. This approach nearly eliminates false triggers but is more expensive and requires careful aiming.
Smart and WiFi-Enabled Options
WiFi-connected motion lights integrate with smart home systems like Alexa, Google Home, or Apple HomeKit. You can schedule them, dim them remotely, or receive phone notifications when motion is detected. Many of these fixtures also include smart scheduling that adjusts behavior based on sunset and sunrise times, which change with the seasons.
Recent reviews of outdoor motion sensor lights highlight models that offer both traditional sensor reliability and smart features without requiring a separate hub. Battery-powered smart versions are popular for renters or temporary installations because they don’t need hardwiring.
The trade-off: smart lights cost 2–3 times more than standard sensors, require a strong WiFi signal at installation, and depend on cloud connectivity. For a basic security light at your back door, a simple hardwired PIR may be all you need. For complex multizone coverage or integration with a larger smart home system, the smart option justifies its cost.
Choosing the Right Placement and Coverage for Your Outdoor Spaces
Placement determines whether your motion lighting actually protects and illuminates the areas you care about. Start by mapping your property’s “dark zones”, entry points, walkways, garage aprons, and any corner or alcove where someone could hide or trip.
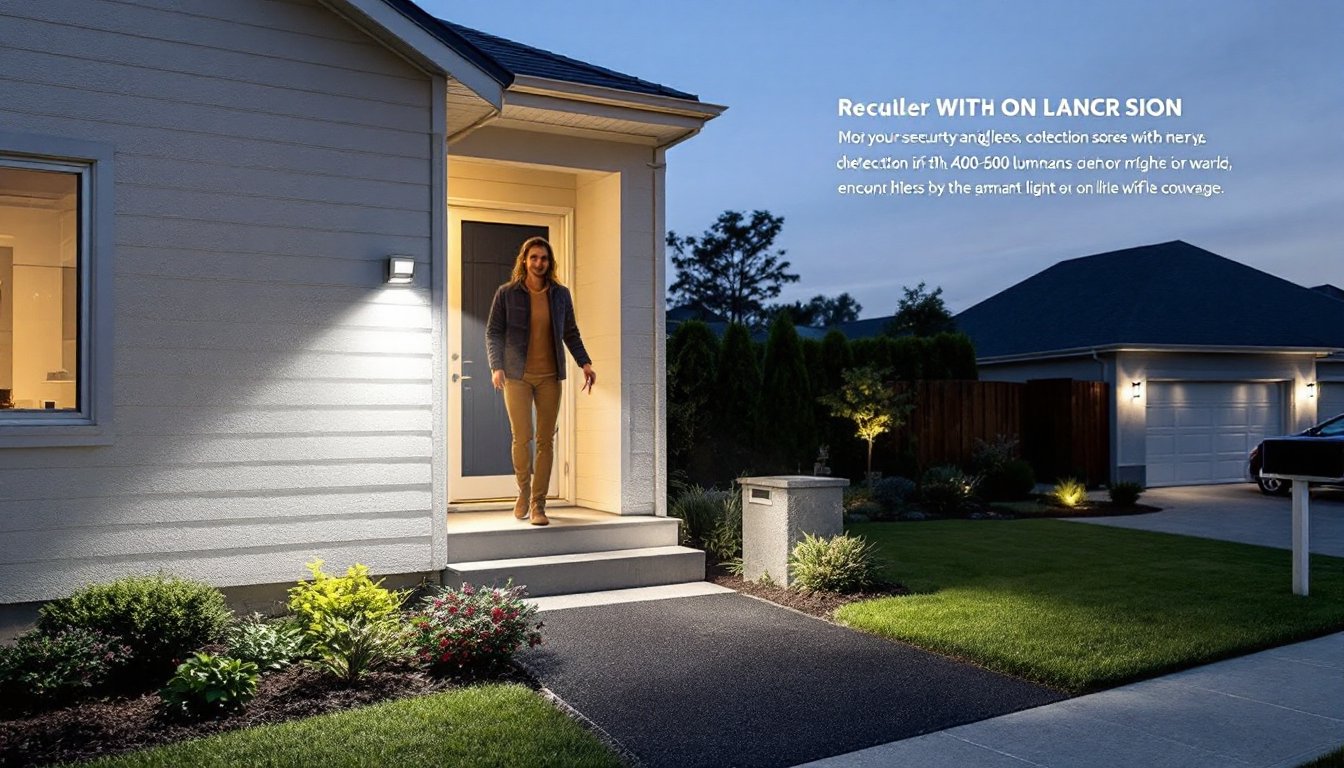
Entry points (front door, back patio door, garage entry) should have a light mounted 6–8 feet high, angled slightly downward. This height gives good coverage of the approach without blinding anyone on the doorstep. A single fixture typically covers a fan-shaped area about 12 feet wide and 15 feet deep.
Corners and alcoves need special attention. Mount the sensor so it “sees” the area you want lit, not just the wall it’s mounted on. If your light is on the corner of your house, angle the sensor head toward the ground and outward, not straight at the wall. Many false triggers happen because sensors detect their own fixture’s reflection in windows or siding.
Driveway and perimeter paths benefit from staggered placement, fixtures spaced 20–30 feet apart along the length. This creates overlapping zones of coverage and prevents dark gaps between lights.
Check your local building codes or HOA requirements before installation. Some jurisdictions require dark-sky-compliant fixtures (with shielding that directs light downward, not into the sky) or limit brightness in residential neighborhoods. Motion-activated outdoor lights vary widely in output, measured in lumens, 200–500 lumens suits most residential entry lights, while perimeter security lighting often uses 800–1200 lumens.
Installation Tips and Best Practices for Homeowners
Most motion sensor lights come hardwired (standard 120V outdoor circuit) or battery-powered. Hardwired is the better long-term choice for permanent fixtures: batteries need replacing every 1–2 years.
For hardwired installation, you’ll need a dedicated 15-amp outdoor circuit running through PVC conduit to code. If you don’t have an available circuit, hire a licensed electrician, running new outdoor circuits involves digging, proper grounding, and GFCI protection that doesn’t tolerate shortcuts. This is one case where a DIYer should know their limits. Budget $200–400 for professional installation of a new circuit.
If you’re tapping into an existing outdoor circuit, turn off power at the breaker, test with a voltage tester, and remove the old fixture (if replacing). Connect the motion light’s wires using wire nuts rated for outdoor use, wrap the connection in waterproof silicone tape, and tuck everything into a sealed junction box or the fixture’s built-in terminal block. Don’t skimp on waterproofing, corroded connections are the leading cause of motion light failure.
For battery-powered models, mounting is simpler: drill a hole, insert a wall anchor or wood screw, and attach the bracket. Use stainless steel fasteners in wet climates to avoid rust. Battery lights should be mounted within WiFi range if they’re smart-enabled, which sometimes means repositioning them after installation.
Sensor adjustment is overlooked and critical. After installation, spend time adjusting the sensitivity dial and time delay. High sensitivity causes false triggers: medium-to-low works best for most homes. A 30-second or 60-second time delay is standard, long enough to move through an area without the light flickering off mid-walk, but short enough to save energy. Test these settings at night when conditions match actual use.
Wear safety glasses and work gloves, and always confirm power is off before touching any hardwired connections.
Maintenance and Optimization for Long-Term Performance
Motion sensor lights are low-maintenance compared to other outdoor fixtures, but regular checks prevent problems.
Sensor lens cleaning is the most important step. Dust, spider webs, and pollen accumulate on the sensor window and block detection. Wipe the lens gently with a dry cloth every 2–3 months, more often in dusty or sandy climates. Use a microfiber cloth, abrasive materials scratch the plastic and reduce sensitivity.
LED bulbs (now standard in motion fixtures) last 25,000–50,000 hours, but the sensor and wiring may fail first. If a light suddenly stops responding to motion, check the sensitivity dial before assuming it’s broken, sometimes vibrations or weather adjustments shift the dial without you noticing.
Seasonal adjustments matter. In winter, shorter days mean your sensor may stay active longer into the morning. Re-aim the sensor if winter shadows or landscaping growth block its field of view. In spring, new plant growth can obscure detection zones, trim back shrubs and branches that now sit in front of the sensor.
Hardwired fixtures occasionally develop corrosion at connection points, especially in coastal or humid climates. Every year or two, turn off the breaker, loosen the fixture slightly, and inspect the junction box and wires. If you see green or white oxidation on copper connections, clean it with a dry brush and consider applying a thin coat of dielectric grease (a non-conductive lubricant) to protect against future corrosion.
Modern smart home technology allows you to test motion sensors remotely if they’re WiFi-enabled, walk past your phone’s camera feed to confirm detection, then adjust as needed. Battery-powered models should have their batteries swapped out in late summer, before fall and winter increase darkness and activity around your home.


