
Kitchen lighting is more than just flipping a switch, it’s the difference between a space that feels welcoming and one that feels dingy, even with fresh paint on the walls. Poor overhead lighting can turn meal prep into a squinting session and make your kitchen feel smaller and darker than it actually is. The right ceiling kitchen lighting ideas transform how you work and live in that space, adding both function and style. Whether you’re dealing with a low ceiling, open-concept layout, or dark corners that never seem to brighten, there’s a solution worth exploring. This guide breaks down seven modern ceiling lighting approaches that work for real kitchens, not just Pinterest boards.
Table of Contents
ToggleKey Takeaways
- Ceiling kitchen lighting ideas should combine at least two or three approaches—such as overhead recessed lights, pendant accents, and cove ambient lighting—to balance task lighting, style, and mood in your space.
- Recessed lighting requires proper spacing of 4–6 feet apart in a grid pattern and LED dimmable trims to avoid dark corners, while pendant lights should hang 30–36 inches above countertops with a diameter roughly one-third the surface width below.
- For low-ceiling kitchens under 8 feet, flush or semi-flush fixtures mounted directly to the ceiling provide bright overhead light without stealing vertical space, requiring only straightforward electrical connections to your existing junction box.
- LED brightness is measured in lumens (aim for 2,500–4,000 lumens for task areas, 1,500–2,000 for general lighting), and color temperature should blend neutral white 3000–4000K over work zones with warm 2700K ambient light for dining relaxation.
- Track lighting offers flexible, adjustable illumination for kitchens with changing layouts, while LED cove strips hidden above cabinets create luxurious indirect ambient light without new ceiling cutouts.
- Choose LED bulbs and fixtures with 90+ Color Rendering Index (CRI) so food and finishes look natural, and always consult a licensed electrician if wiring, drywall cutting, or electrical work feels beyond your comfort level.
Recessed Lighting for Clean, Contemporary Kitchens
Recessed lights (also called “can lights” or downlights) sit flush in the ceiling and deliver a sleek, uncluttered look that works in almost any kitchen style. They’re ideal for modern and minimalist designs because they disappear into the ceiling rather than hanging down like a visual anchor.
When planning recessed lighting, spacing matters. A standard rule is to place fixtures 4–6 feet apart in a grid pattern, adjusting based on the trim ring diameter and ceiling height. For a 9-foot ceiling, 4-foot spacing works well: for 8-foot ceilings, you might tighten it to 3–4 feet. Each 4-inch trim ring recessed light covers roughly a 4-foot-diameter circle on the working surface below.
Choose LED recessed trims (they run cooler, last longer, and cost less to operate) over older halogen options. Verify they’re dimmable if you want to adjust brightness at different times of day, this is especially useful for kitchen work versus evening relaxation. Installation requires cutting holes in the ceiling and running electrical wiring: this isn’t beginner work if you’re not comfortable working with power or existing circuits. If your kitchen ceiling has no attic space above it, retrofitting recessed lights becomes trickier and might require a licensed electrician.
One common mistake: clustering all recessed lights over the main work areas and leaving corners dark. Spread them across the full ceiling to avoid shadows and uneven illumination. A kitchen island or peninsula may need its own dedicated lights, placed roughly 3 feet in front of where you’ll stand.
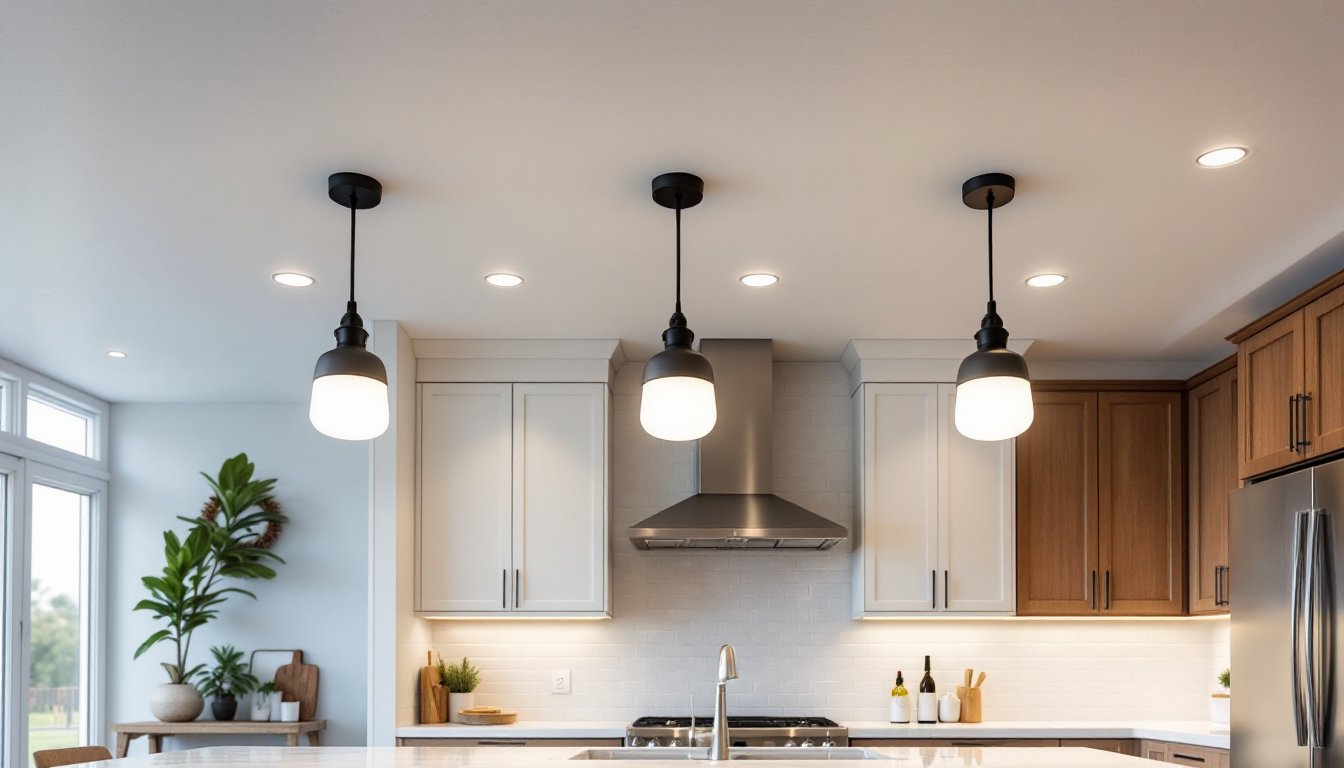
Pendant Lights: Adding Style and Focus to Your Kitchen
Pendant lights are the jewelry of kitchen lighting, they hang from the ceiling on a cord, chain, or stem and add personality and warmth that recessed fixtures alone can’t deliver. They’re perfect over kitchen islands, peninsulas, or dining tables where you want to draw the eye and create a focal point.
Pendant lights come in endless styles: industrial metal, frosted glass, fabric drum, sculptural ceramic, or minimalist geometric shapes. Size matters: oversized pendants can overwhelm a small kitchen, while tiny ones disappear in a large space. A rule of thumb is to choose a diameter roughly one-third the width of the surface below. For a 4-foot-wide island, you’d want pendants with roughly 14–16-inch diameters.
Single Pendant vs. Clustered Configurations
A single pendant works if your island is narrow (under 3 feet) or if you want a bold statement piece. For wider islands or peninsulas, groups of two or three pendants spaced 24–36 inches apart deliver better task lighting and more balanced visual weight. When planning cluster spacing, hang them at the same height (typically 30–36 inches above the countertop) and use identical or coordinated fixtures so they feel intentional rather than random.
Hang the lowest point of the pendant at least 60 inches above the floor if you want to walk under it without bumping your head, or 30–36 inches above the counter surface for islands and peninsula dining. Be sure your electrical box and wiring can handle the load. Pendant lights with dimmers let you brighten them for cooking and dim them for evening entertaining. Style-wise, 10 easy pieces: pendant lights for kitchens showcases options ranging from budget-friendly to splurge-worthy, giving you a real sense of what’s available before you commit.
One caution: pendant lights can create glare if they’re too bright or positioned where they shine directly in your eyes as you work. Look for frosted or diffused shades that soften the light output.
Flush Mount and Semi-Flush Fixtures for Low-Ceiling Spaces
Not every kitchen has 9-foot ceilings. If your kitchen maxes out at 8 feet (or less), recessed lights and hanging pendants become problematic, recessed lights steal precious head clearance, and low-hanging pendants become claustrophobic or a bonk risk.
Flush mount fixtures mount directly to the ceiling with zero drop (or just 1–2 inches), giving you all the brightness you need without eating into vertical space. Semi-flush fixtures hang 4–6 inches below the ceiling, offering a slight visual break without the dramatic drop of a pendant. Both styles come in hundreds of finishes and designs: brushed nickel, matte black, brass, fabric, frosted glass, or textured ceramic.
When choosing a flush or semi-flush fixture for overhead kitchen lighting, aim for at least 1,500–2,000 lumens (more on lumens below). A single central fixture can feel lonely in a larger kitchen: pairing it with under-cabinet or recessed accent lighting fills in shadows. Flush mounts are also easier to retrofit than recessed lights because they mount to your existing electrical box without cutting ceiling holes. Installation is straightforward if you’re comfortable turning off power and wiring a fixture, it’s one of the more DIY-friendly lighting projects.
Semi-flush fixtures with a glass or fabric shade diffuse light more evenly than bare bulbs, reducing harsh glare on countertops and dining tables.
Track Lighting for Flexibility and Adjustable Illumination
Track lighting mounts a metal rail to your ceiling and lets you aim individual halogen, incandescent, or LED heads wherever you need them. It’s the chameleon of kitchen lighting, excellent if your kitchen layout might change or if you want to light specific zones without running new electrical circuits.
One 4-foot track typically supports 3–4 fixtures, though specs vary. Space the heads 12–18 inches apart along the track to avoid dark gaps. Track systems are available in single-track (straight line), L-shaped, or more complex configurations that bend around islands or peninsulas. Monorail systems use a thinner, more elegant single-conductor rail: traditional track has a wider profile but handles more fixtures.
Choose LED track heads with an adjustable beam angle (typically 25–50 degrees) so you can narrow the focus over a counter or widen it to wash a wall. Dimmable LED heads paired with a dimmer switch give you flexibility to shift from bright task lighting during meal prep to softer ambiance in the evening.
Track lighting works especially well layered with other ceiling fixtures. Use it to accent artwork, highlight a backsplash, or light a dark corner that recessed lights or a central flush mount leaves in shadow. The main drawback: tracks are visible, so they work best in contemporary or industrial kitchens rather than traditional or farmhouse styles. Installation requires running power to your ceiling electrical box: if you’re not handy with wiring, bring in an electrician.
LED Cove and Ambient Lighting for Layered Brightness
Cove lighting hides LED strips in a recessed ledge or soffit above your cabinets (or above a kitchen soffit, if you have one) and bounces soft light off the ceiling. It creates a warm, indirect glow that feels luxurious and adds depth to the room. Unlike task lighting, cove lighting doesn’t illuminate your work surface directly, it’s ambient, meant to wrap the room in light.
LED cove strips are affordable and simple to install: measure, mark, and stick adhesive-backed strips to the upper inside edge of your cabinet run or soffit. They run on low voltage (usually 24V) and require a plug-in transformer or a hardwired power supply. Strip width and brightness vary: choose warm white LEDs (2700K color temperature, more on this below) for a cozy kitchen feel.
LED strip lighting adds flexibility to your overall lighting scheme, you can run cove strips, under-cabinet strips, and even behind open shelving to layer light throughout the space. The advantage is no new ceiling cutouts, no heavy-duty electrical work, and a soft, flattering effect that makes kitchens feel larger and more inviting than harsh recessed light alone.
Control cove lighting with a simple on/off switch, a dimmer, or a smart home controller. Many LED strips come with wireless remotes or app-based controls, letting you set brightness and color temperature from your phone. One tip: LED cove strips work best when paired with dimmable overhead lighting so you can reduce glare when cove lights are in use.
Choosing the Right Brightness and Color Temperature
Brightness is measured in lumens (total light output), not watts. A modern LED produces far more light per watt than old incandescent or halogen, so comparing wattage is outdated and misleading. For kitchen task areas (countertops, islands, stovetop), aim for 2,500–4,000 lumens total. For general kitchen lighting (over a breakfast table or seating area), 1,500–2,000 lumens is sufficient.
Color temperature measures how warm or cool light feels, rated in Kelvin (K). Kitchen lighting typically falls into three ranges: 2700K (warm white) feels cozy and residential: 3000–4000K (neutral white) is bright and businesslike, good for cooking: 5000K+ (cool white) resembles daylight and is harsh for living spaces. Most kitchens benefit from a mix: bright, neutral task lighting over work zones and warmer ambient light for dining or evening relaxation.
Use these combinations: Recessed and track lights over prep areas: 3000–4000K, dimmable, rated 50–75 lumens per fixture depending on spacing. Pendant lights and flush mounts: 2700–3000K for a welcoming feel. Cove and ambient strips: 2700K to create softness. Dimmers give you the best of both, bright for cooking, dimmed to 2700K warmth for dining.
Check the Color Rendering Index (CRI) on LED bulbs and fixtures: aim for 90 CRI or higher so food, skin tones, and cabinetry look natural, not sickly or washed out. Budget LED fixtures sometimes cut corners on CRI, so read labels carefully. Living room recessed lighting layout principles apply to kitchens too, test samples or visit a showroom before committing to a large install if color and brightness feel unfamiliar.
<h2 id="” data-id=””>Planning and Installing Your Kitchen Ceiling Lighting
The best ceiling lighting for your kitchen combines at least two or three of these approaches: central overhead light (recessed, flush mount, or track) for general illumination, accent lighting (pendants or cove LEDs) for style and focus, and task lighting layers (recessed or track over work areas) for safety and functionality. Start by assessing your ceiling height, layout, existing electrical access, and the mood you want to create. Sketch a quick overhead view of your kitchen, mark your cabinets, island, and main work zones, and block in light fixtures to visualize balance before buying anything.
If wiring, cutting drywall, or working with existing electrical circuits feels beyond your comfort level, hire a licensed electrician, it’s worth the investment for safety and code compliance. Lighting projects often seem small but can have major consequences if done wrong. With the right plan and components in place, your kitchen will brighten up in every sense.


