
Bathroom lighting sets the tone for everything that happens in this intimate space, from rushed morning routines to evening wind-downs. Poor ceiling lighting leaves you squinting at the mirror, shadows under your eyes making you look exhausted, or worse, turning a simple shaving or makeup application into a frustrating guessing game. The right bathroom ceiling lighting, though, transforms the room into a functional, welcoming space where you actually want to spend time. Whether you’re remodeling from scratch or upgrading outdated fixtures, choosing and installing the correct ceiling lighting involves understanding fixture types, layout principles, moisture resistance, and your own skill level. This guide walks you through each decision point so you can nail the project.
Table of Contents
ToggleKey Takeaways
- Bathroom ceiling lighting must be rated for moisture exposure (Zone 1 or 2, with wet or damp location certifications) to prevent corrosion and electrical hazards in humid environments.
- Choose between flush mounts for low ceilings, semi-flush mounts for decorative appeal, or recessed lights for a modern, shadow-free look—each offers different aesthetic and functional benefits.
- Layer your bathroom ceiling lighting with ambient overhead fixtures, task lighting at the vanity (24–32 inches wide, mounted at eye level), and optional accent lighting to eliminate shadows and improve visibility.
- For DIY installation, turn off power at the breaker, use a voltage tester, ensure proper wire connections (hot to hot, neutral to neutral, ground to ground), and obtain permits for new installations to stay code-compliant.
- Use IC-rated recessed housings when touching insulation, select LED bulbs designed for wet locations, and run the exhaust fan during and 20–30 minutes after showers to extend fixture lifespan.
Why Bathroom Ceiling Lighting Matters
Bathroom lighting does more than illuminate, it affects how you see yourself, sets ambiance, and impacts your entire morning routine. Unlike living rooms where soft, layered lighting works fine, bathrooms demand bright, even illumination. You’re applying makeup, shaving, or examining your skin up close: unflattering or dim light makes everyday tasks harder and can even lead to accidental cuts or product mishaps.
Moisture is the other critical factor. Bathrooms experience humidity spikes from hot showers, and ordinary ceiling fixtures corrode, yellow, or fail quickly in wet conditions. Building codes (specifically the IRC, International Residential Code) require bathroom ceiling lights in zones 0, 1, and 2 to be rated for moisture exposure. Skipping this detail means replacing fixtures every couple of years or risking electrical hazards.
Finally, ceiling lighting sets the visual anchor of the room. A well-placed, properly rated fixture becomes invisible, people notice only that the space feels bright and welcoming, not the light source itself. A poorly chosen fixture or installation becomes an eyesore or a perpetual maintenance headache.
Types of Bathroom Ceiling Fixtures to Consider
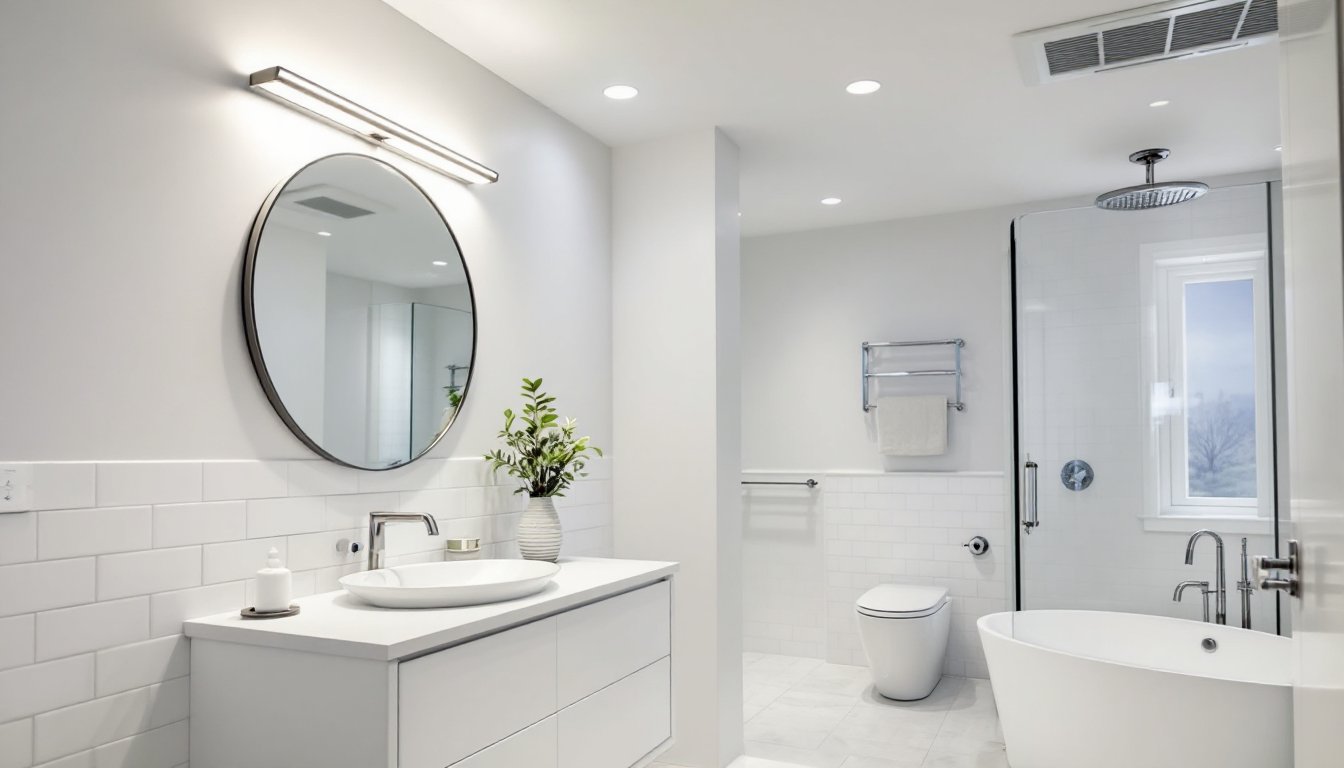
Flush Mounts and Semi-Flush Options
Flush mounts sit tight against the ceiling, ideal for bathrooms with standard 8-foot ceilings or lower. They’re straightforward to install, come in countless styles, and work well in moisture-prone areas when you choose a fixture rated for Zone 1 or 2 exposure. A typical flush mount uses a simple bracket attached to the electrical box, with the fixture secured and sealed against the ceiling.
Semi-flush mounts hang 4 to 12 inches below the ceiling, offering a more decorative look while still being compact. Both styles offer excellent moisture ratings if you buy fixtures specifically labeled for bathrooms. Avoid basic ceiling lights from hardware stores labeled only for “damp” environments, these aren’t sufficient for shower areas. Look for “wet location” or “damp location” certifications (UL or ETL rated).
Recessed Lighting for Modern Bathrooms
Recessed lights (also called can lights or downlights) sit inside the ceiling cavity, creating a sleek, uncluttered look. They’re excellent for bathrooms because they provide distributed, even light and virtually disappear into the ceiling. Recessed fixtures are ideal if you’re planning a living room recessed lighting layout approach, spacing multiple small cans evenly across the ceiling yields flattering, shadow-free illumination.
Recessed fixtures do require ceiling height and roughing-in before drywall (harder to retrofit), but modern wafer-thin or shallow-depth cans minimize this problem. Crucially, buy recessed lights rated for damp or wet locations and install them in insulated ceiling cavities, moisture and insulation interact poorly with standard trims. Pair recessed lights with a small flush mount fixture centered over the vanity for task lighting, and you’ve created professional-grade bathroom illumination.
Designing Your Bathroom Lighting Layout
Smart bathroom lighting uses layers: ambient ceiling light, task lighting over the vanity, and optional accent lighting. Ceiling lights should illuminate the entire room evenly: a single centered fixture works for small half-baths, but bathrooms over 50 square feet benefit from multiple recessed cans or a wider flush mount.
For vanity-specific light, install a horizontal 24- to 32-inch fixture mounted at eye level (about 60 to 66 inches from the floor). This angle eliminates shadows on the face and minimizes glare. If you’re using recessed ceiling lights, space them in a grid: for a 8-foot by 10-foot bathroom, place three cans in a line or a triangle pattern, roughly 4 feet apart. Test spacing by standing at the vanity and imagining where shadows would fall.
Battery-powered strip lights inside medicine cabinets or under floating shelves add soft, functional accent lighting without electrical rewiring, useful for creating visual interest the way contemporary dining room lighting uses layering. Avoid placing a single overhead light directly above the mirror: this creates unflattering shadows underneath the eyes.
Installation Tips for DIY Success
Before starting, turn off power at the breaker and verify it’s off with a non-contact voltage tester (a $15 tool that saves your life). If you’re replacing an existing fixture, the junction box is already in place: unscrew the old bracket, disconnect the wires, and reverse the process with the new one. Most bathroom fixtures use standard 14/2 or 12/2 Romex cable (check your local code). Strip about 3/4 inch of insulation from each wire, use wire nuts to join them securely (hot to hot, neutral to neutral, ground to ground), and fold the connections neatly into the junction box.
For new installations, you’ll need to route cable from the breaker panel and mount a new electrical box. This step often requires a permit and inspection in most jurisdictions, don’t skip it. If you’re not confident working inside walls or the breaker panel, hire a licensed electrician. It’s cheaper than rewiring after a fire.
When installing recessed fixtures, cut the drywall hole to size using the included template, position the trim ring or bezel, and secure the fixture to the ceiling joists with the mounting brackets. Use IC-rated housings (insulation contact) if they touch insulation: standard housings can overheat. Seal around the fixture with caulk rated for moisture to prevent humid air from leaking into the attic.
For flush mounts, position the bracket on the electrical box, thread the wires through the center, screw the bracket tight, then attach the fixture body and trim ring. Secure the bulbs (check the wattage limit, most fixtures use LED bulbs rated for wet locations, typically 10–15 watts equivalent to old 60-watt incandescent).
Lighting and Moisture: Choosing Fixtures for Wet Environments
Bathrooms create three zones with different moisture exposure: Zone 0 is inside the tub or shower (fixtures must be submersible, rare for ceiling lights), Zone 1 is the area directly above the tub/shower to about 6 feet horizontally, and Zone 2 is the rest of the bathroom. Your ceiling light almost certainly falls in Zone 1 or 2, so buy only fixtures certified for those zones.
Check the fixture’s IP (Ingress Protection) rating. IP54 or higher means dust and water resistance: IP65 or higher is fully sealed against jets. A simple label on the box should say “wet location” or “damp location.” If it doesn’t, don’t use it, moisture will corrode the electrical contacts, wires, and metal parts within months.
Use LED bulbs rated for damp/wet locations: they run cooler and last longer than incandescent in humid conditions. Avoid bare halogen or vintage-style bulbs in bathroom ceilings, they retain heat and fail faster. Pair your ceiling light with a GFI (Ground Fault Interrupter) outlet or circuit (required by code for bathroom outlets). If your light circuit isn’t on a GFI, have an electrician add one at the breaker panel.
Some homeowners rely on whole-bathroom guidance from sources like Remodeling 101: How to Install Flattering Lighting in the Bathroom, which emphasizes choosing fixtures that resist humidity while flattering the skin. Ventilation matters too, a running exhaust fan pulls moisture away from fixtures, extending their lifespan. Run the fan during and for 20–30 minutes after showers.


