
Small pendant lights are the kitchen’s unsung heroes. They deliver focused light right where you need it, over an island, sink, or breakfast bar, without the bulk of a large chandelier or track system. Unlike overhead fixtures that cast everything in harsh, shadowless light, pendant lights create layered illumination that makes your kitchen feel both functional and inviting. Whether you’re renovating or refreshing your space, mini pendant lighting for kitchen islands and countertops offers versatility in style, size, and installation. This guide walks through everything a homeowner needs to know about choosing, sizing, and installing small pendant lights that actually work for your kitchen’s layout and lifestyle.
Table of Contents
ToggleKey Takeaways
- Small pendant lights for kitchen islands eliminate dark zones and task shadows while maintaining open sightlines, making them ideal for functional and inviting kitchen designs.
- Optimal pendant sizing ranges from 4–6 inches for standard islands and 2–4 inches for narrow spaces, with proper installation placing bottoms 30–36 inches above countertops to avoid bonking and shadows.
- Modern minimalist pendants with matte finishes pair best with contemporary kitchens, while farmhouse styles featuring Edison bulbs and warm white (2700K) bulbs create cozy, character-rich spaces.
- Professional installation requires turning off power, using a non-contact voltage tester, and matching wire gauges with appropriately sized wire nuts—local electrical codes may require licensed work for multi-pendant clusters.
- LED bulbs are essential for efficiency, using 75% less energy than incandescent while providing 400–600 lumens for task lighting, with 3000K color temperature offering the ideal balance between warmth and clarity for most kitchens.
- Layering pendant lights with under-cabinet strips and recessed fixtures creates balanced, shadow-free workspace illumination that makes cooking more enjoyable and less frustrating.
Why Small Pendant Lights Are Perfect For Kitchen Spaces
Small pendant lights solve a real problem: general overhead lighting leaves dead zones. That dark corner by your cutting board? The shadow cast by your own body as you chop vegetables? Pendant lights aimed at task areas eliminate both. They’re also adjustable in height, so you can position them to illuminate without creating glare on stainless steel appliances or granite countertops.
For kitchen islands specifically, mini pendant lighting creates visual interest while keeping sightlines open. Unlike a bulky light fixture, a cluster of three or four small pendants suspended at varying heights feels modern and lets people move freely underneath without ducking. They’re also the gateway to layering, combining pendants with under-cabinet strips and recessed lights creates the kind of balanced, shadow-free workspace that makes cooking less frustrating.
Small pendants are forgiving to install in most kitchens, too. Most plug into a standard ceiling junction box that already exists, requiring only a basic retrofit can or an adapter ring if you’re replacing an older fixture. This means you can often complete the swap in an afternoon without calling a licensed electrician, though you should always check local codes first. Many homeowners find inside cabinet lighting works beautifully alongside pendant lights to create complete kitchen illumination.
Essential Design Styles to Consider For Your Kitchen
Modern Minimalist
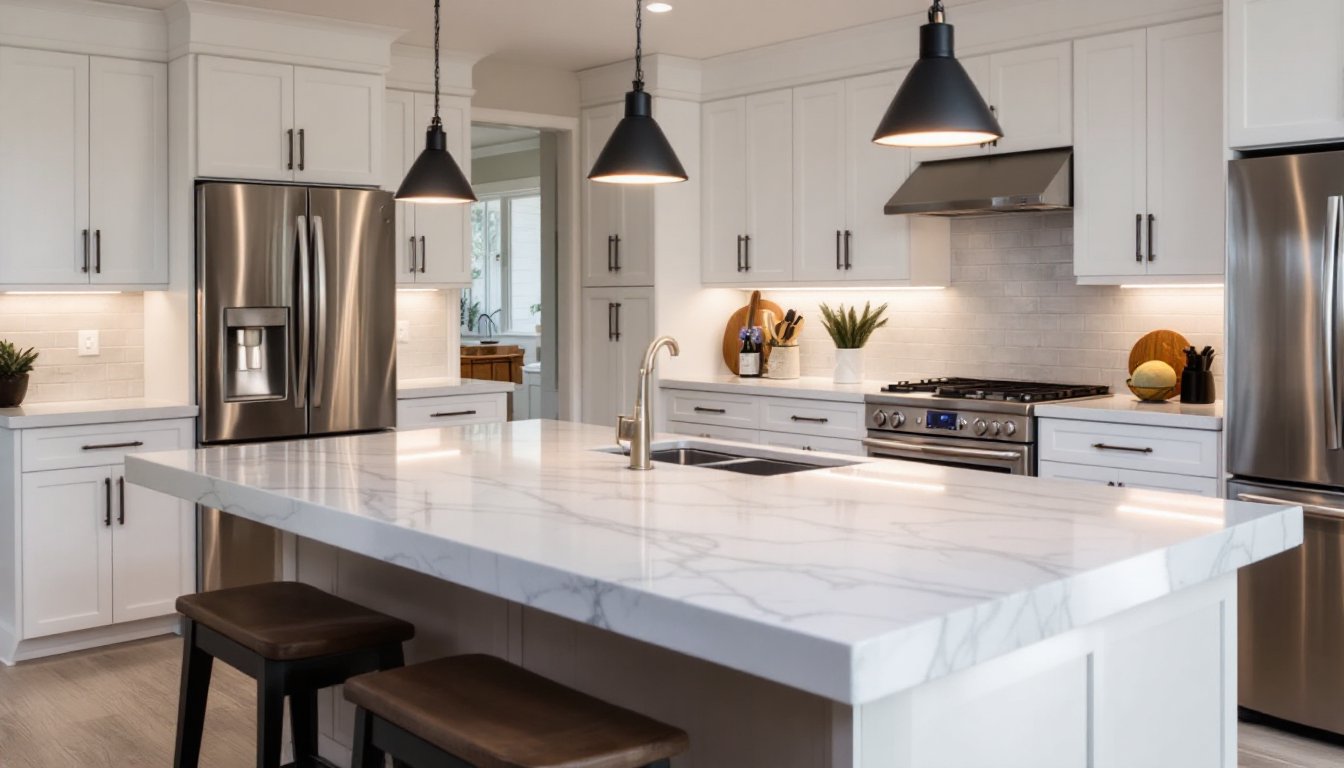
Modern minimalist pendant lights strip away ornamentation. Look for clean geometric shapes, cylinders, spheres, or simple cones in matte black, white, or brushed bronze finishes. The appeal lies in simplicity: no decorative scrollwork, no fabric shades, just form and function. Materials matter: metal bodies with frosted glass or acrylic diffusers scatter light evenly without glare. A trio of 1.5-inch to 3-inch diameter mini pendants suspended 30–36 inches above an island creates rhythm without clutter. Anchor lines in matte black or chrome match stainless appliances and handle pulls, making the whole space feel intentional.
Minimalist pendants pair well with pale cabinetry and quartz countertops. They also work in transitional kitchens, spaces that blend traditional and modern elements. The neutral finish won’t compete with bold backsplash tile or open shelving.
Farmhouse and Rustic
Farmhouse pendant lights lean into warmth and character. Edison bulbs, visible filaments, and amber-tinted glass are hallmarks. Look for finishes like oil-rubbed bronze, aged copper, or weathered wood. These fixtures often feature Mason jar–style glass or perforated metal shades that cast interesting shadow patterns on your ceiling.
Rustic pendants work especially well over kitchen islands when paired with reclaimed-wood accents, open shelving, or vintage-style hardware. A four-pack of small Edison-style pendants hung at staggered heights mimics the charm of a farmhouse kitchen without feeling precious. Warm white bulbs (2700K color temperature) enhance the cozy vibe. Modern farmhouse dining room lighting shares similar principles and can inform your pendant choices if your kitchen flows into a dining space.
Both styles benefit from LED strip lighting ideas used in conjunction, layering direct pendant light with ambient or accent light underneath cabinets for depth.
Choosing the Right Size, Height, and Placement
Size matters more than it sounds. A pendant shade that’s too large (say, 8 inches in diameter) overpowers a standard kitchen island. Aim for 4–6 inch diameter shades for islands: go smaller (2–4 inches) if your island is narrow or your ceiling is low. The shade diameter also affects beam spread, a smaller shade creates a more concentrated pool of light, while a wider shade casts a gentler wash.
Height placement is where most DIYers stumble. Pendants hung too high provide ambient light but skip task lighting: hung too low, they become a bonk-your-head hazard and create shadows under the fixture. Standard installation places pendant bottoms 30–36 inches above the counter surface. For an island, this means 42–48 inches from the floor if your island counter is 36 inches high. Use an adjustable rod or field-wirable chains to dial in the exact height after installation, don’t guess.
Spacing is equally critical. For a 4-foot island, hang two pendants 24–30 inches apart, centered over the island. A 6-foot island takes three, spaced 18–24 inches apart. Asymmetrical placement also works beautifully if your kitchen layout warrants it, position pendants over active work zones rather than spreading them evenly.
Before drilling any holes, turn off the breaker at your panel and use a non-contact voltage tester to confirm the existing box is de-energized. Mark your proposed holes with a pencil, then use a stud finder to locate joists. If your hole falls on a joist, move it a few inches: don’t force a ceiling ring through one. For kitchens under 10 feet wide, mini pendant lighting for kitchen islands works best when at least one pendant aligns with a window or glazed door to bounce natural light. Under cabinet kitchen lighting should complement but not compete with pendant placement.
Installation Tips For Homeowners and DIY Enthusiasts
Before you buy anything, confirm what you’re working with. Turn off power at the breaker. Use a non-contact voltage tester on the existing ceiling box, twice, to make sure it’s dead. This is not a step to skip. Open the box and check the wire gauge (14-gauge or 12-gauge Romex cable) and the box type (fan-rated boxes hold heavier fixtures: standard boxes work for most pendants under 5 pounds). If you see aluminum wiring or knob-and-tube, hire a licensed electrician.
For most modern homes, the existing light box is rated for a standard fixture swap. You’ll need a mounting bracket kit (usually included with the pendant), the pendant assembly itself, 18–24 inches of chain or rod, and a canopy cover. Grab wire nuts (18–22 gauge) and a small roll of electrical tape if they’re not included.
The installation sequence: secure the mounting bracket to the ceiling box with the supplied fasteners, strip ½ inch of insulation from the incoming house wires and the pendant wires, and connect black-to-black, white-to-white, and green/bare-to-green using appropriately sized wire nuts. Gently fold wires back into the ceiling box (don’t kink them), then slide the canopy up and tighten. Hang the chain, test the fixture, and adjust height as needed.
For clusters of three or more pendants, use a multi-light junction box kit if the existing box doesn’t support multiple cables, or run separate circuits if permitted. Check your local electrical code, some jurisdictions require licensed work for anything beyond a single-fixture swap. Install bulbs after everything is secure and powered on, and use the appropriate wattage and color temperature (2700K for warm, 4000K for neutral light). Installing under cabinet lighting follows similar electrical protocols if you pair pendants with other fixtures.
Lighting and Energy Efficiency Features to Prioritize
LED bulbs are now the default for good reason: they use 75% less energy than incandescent, last 25,000–50,000 hours, and produce minimal heat. For kitchen pendants, buy bulbs labeled A19 or A21 (standard sizes) or globe-shaped if your fixture specifies. Check the lumen output (brightness): most task-light pendants need 400–600 lumens per bulb: ambient pendants can go as low as 200 lumens.
Color temperature is worth discussing. 2700K (warm white) mimics incandescent and suits farmhouse styles. 3000K (soft white) bridges warm and neutral, a safe middle ground. 4000K (neutral white) is crisp and energizing: it’s popular in contemporary kitchens because it doesn’t yellow skin tones or food. Many resources like Apartment Therapy recommend 3000K for kitchens as a compromise between warmth and clarity.
Dimmable bulbs paired with a compatible dimmer switch let you adjust brightness for different times of day. Not all LED bulbs are dimmable, read the package. If you’re upgrading existing wiring, a smart dimmer (WiFi-enabled) lets you set scenes from your phone, though it’s an extra cost most DIYers don’t need.
Other efficient features to seek: frosted or diffused glass reduces harsh shadows and glare, lowering eye strain during long prep sessions. Integrated LED pendants (where the bulb is built-in) are sealed against dust and last even longer but can’t be easily replaced. For modular flexibility, choose fixture-ready pendants with replaceable bulbs. Verify the bulb base type, standard E26 (medium) bases are most common, but some mini pendants use E12 (candelabra), which limits your bulb selection. Contemporary dining room lighting explores similar efficiency principles if your kitchen opens to other living spaces.


