
Outdoor lighting doesn’t have to mean high voltage wiring, complex electrical work, or running up your power bill. Low-voltage 12V landscape lighting is the practical choice for homeowners who want reliable, attractive outdoor illumination without the safety headaches of 120V systems. Whether you’re lighting a pathway, accentuating landscape features, or creating ambient yard lighting, a 12V system delivers flexibility, easier installation, and real energy savings. This guide walks you through everything you need to know to plan, choose, and install 12V landscape lighting that works for your space.
Table of Contents
ToggleKey Takeaways
- 12V landscape lighting reduces energy costs by 50–70 percent compared to traditional 120V systems, with fixtures consuming only 5–15 watts versus 40+ watts for older styles.
- Low-voltage 12V systems offer superior safety with zero risk of serious injury from accidental wire contact and require no permits, licensed electrician, or expensive conduit installation.
- Proper transformer sizing (20% above your total fixture wattage) and appropriate wire gauge selection—heavier gauge for runs over 75 feet—prevent voltage drop and ensure consistent brightness.
- Quality screw-down or weather-sealed connectors are essential for reliable 12V landscape lighting performance; cheap push-in connectors corrode and cause flickering or system failure.
- A methodical five-step DIY installation process—planning, transformer mounting, cable routing, fixture connection, and testing—allows homeowners to create attractive outdoor lighting in a single afternoon.
Why 12V Landscape Lighting Is the Smart Choice for Homeowners
Energy Efficiency and Cost Savings
Low-voltage systems are fundamentally more efficient than their high-voltage cousins. A 12V LED landscape light consumes a fraction of the power of traditional 120V fixtures, often 5 to 15 watts per fixture compared to 40 watts or more for older styles. Over a season of nightly operation, that difference adds up. Most homeowners report 50 to 70 percent lower lighting costs when switching to 12V LED systems, depending on fixture count and runtime.
You’ll also save money upfront. No trenching electrical lines across your yard, no licensed electrician required for the basic system setup, and no expensive conduit or direct burial wire for code compliance. The transformer (which steps standard 120V down to 12V) costs $100 to $300, and low-voltage cable runs $1 to $3 per foot, far less than the $3 to $8 per foot for high-voltage alternatives.
Safety and Installation Benefits
Here’s the hard truth: 120V outdoor lighting kills. It’s rare, but contact with a live 120V line in wet conditions is lethal. A 12V system carries no such risk. Even if you accidentally cut the wire while digging, the voltage is too low to cause serious injury. That’s not an excuse to be careless, you still need to respect the equipment, but it’s a genuine safety advantage, especially if you have kids or pets who might explore the yard.
Installation is straightforward enough for a competent DIYer. No permits required (check your local code, but most jurisdictions don’t require them for low-voltage outdoor lighting). No conduit needed. You can run cable above ground, stake lights in a single afternoon, and adjust the layout later without calling an electrician. That flexibility means you can experiment, move fixtures around, or expand the system as your landscape evolves.
Choosing the Right 12V Lighting System for Your Outdoor Space
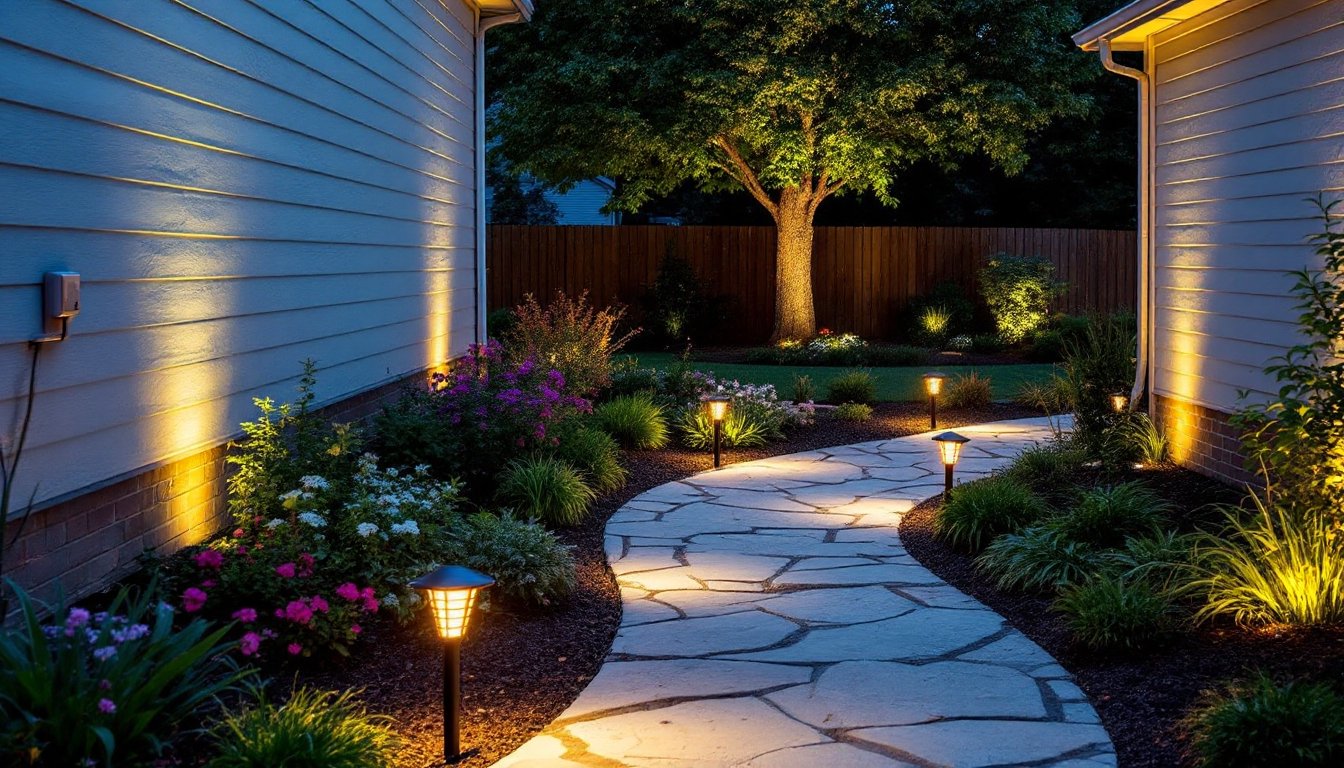
Start by defining what you want to light. Are you illuminating a pathway for safety and visibility, uplighting a tree, creating ambient poolside glow, or highlighting architectural details? Each application calls for different fixture types and brightness levels. A pathway light needs maybe 100 to 200 lumens: accent lights on a landscape feature might need 300 to 600 lumens depending on distance and contrast.
Transformer size matters. A typical residential transformer ranges from 500 watts to 2000 watts. To calculate your needs, add up the wattage of every fixture you plan to install, then choose a transformer rated at least 20 percent higher to avoid overloading. A 1000-watt transformer typically supports 8 to 12 landscape lights (assuming 60 to 100 watts each) plus additional pathway lights. Build in headroom, undersizing a transformer causes flickering lights and shortened fixture lifespan.
Decide between a manual timer or smart control. Basic mechanical timers cost $15 to $30 and turn the system on and off at set times. A smart transformer with WiFi control (think Philips Hue or Kasa) runs $150 to $400 but lets you adjust brightness, set zones, or control lights via smartphone. For most DIYers, a simple timer is plenty: smart control makes sense if you want convenience or plan to integrate landscape lighting into a broader smart-home system.
Wire gauge matters for efficiency and safety. Most residential 12V landscape systems use 16-gauge or 14-gauge cable. The farther the light from the transformer, the heavier the gauge needed to minimize voltage drop. A light 50 feet from the transformer on 16-gauge wire might dim slightly: use 12-gauge for runs longer than 75 feet. When in doubt, go one gauge heavier, the cost difference is minimal, and you’ll avoid frustration later.
Essential Components and How They Work Together
Every 12V landscape system needs the same core pieces: a transformer, cable, fixtures, and outdoor connectors.
The transformer is the heart of your system. It takes standard 120V household current and steps it down to safe 12V for your lights. Quality transformers include a timer and weatherproof casing rated for outdoor use. Choose a model with a GFI (ground-fault interrupter) circuit or plug it into a GFI outlet, this kills power instantly if there’s a current leak, protecting anyone in the yard. Mount the transformer near an outdoor outlet on the house or in a weatherproof box: it should be accessible for maintenance but hidden from view if possible.
Low-voltage cable connects the transformer to each fixture. Outdoor-rated cable has insulation rated for sun and moisture exposure. Bury it 2 to 3 inches deep if it crosses a lawn, or tack it along fences and garden edges above ground. Some cable comes with a clip system for easy attachment to existing structures. Don’t use indoor electrical cable, UV and moisture will degrade it within a season.
Fixtures come in dozens of styles: path lights with spikes, recessed uplights, spotlights, string lights, and well lights for in-ground installation. LED fixtures are standard now and far outlast halogen alternatives. Compare color temperature: warm white (2700K to 3000K) creates cozy ambiance, while cooler tones (4000K+) emphasize detail and look more modern. A mixed approach, warm for seating areas, cooler for functional pathways, balances aesthetics and visibility.
Connectors are the often-overlooked detail that determines reliability. Cheap push-in connectors corrode and fail: invest in screw-down connectors or weather-sealed quick-connects that won’t loosen or leak. Bad connections cause flickering, complete fixture failure, or worse, a short that takes down your whole system.
You’ll find comprehensive setup guidance on Digital Trends’ smart home reviews, which covers transformer options and control systems in detail.
Installation and Setup Tips for DIY Success
Step 1: Plan Your Layout
Sketch out where each light goes. Mark pathways, highlight key focal points (a tree, shrub, water feature), and note distances from the transformer. This planning phase prevents costly mistakes and wasted wire.
Step 2: Mount the Transformer
Install it within 25 feet of your outdoor power source if possible to avoid a long, unsightly extension cord. Screw it to the house exterior or a post, ensuring the inlet and outlet are accessible. Plug it into a GFI outlet and test before connecting any lights.
Step 3: Run Cable
Unroll your low-voltage cable in a gentle arc, don’t kink it or wrap it tightly around corners. Bury it along pathways (2 to 3 inches deep), or secure it above ground with clips. Use a metal detector or flag before digging to avoid hitting sprinkler lines or buried utilities. The goal is a clean, concealed run.
Step 4: Connect Fixtures
Use screw-down or weather-sealed connectors to link each fixture to the main cable. Test each light immediately after connecting: if it doesn’t glow, check the connector for corrosion or a cold solder joint. Reseating the connector often solves the problem.
Step 5: Test and Adjust
Turn on the system in full darkness and observe. Lights should all glow evenly. Dimmer lights suggest voltage drop, move them closer to the transformer or upgrade your cable gauge. Adjust fixture angles and positions to eliminate glare and highlight intended features.
A handheld multimeter ($15 to $40) is invaluable for troubleshooting. Test voltage at the transformer output and at distant lights: a significant drop means undersized cable. Resources like Instructables’ lighting guides walk through testing and diagnostics step-by-step.
Common Mistakes to Avoid
Don’t skip surface prep. Clear weeds and uneven ground where lights sit: a light tilted at a 15-degree angle looks sloppy. Acclimate outdoor fixtures to cold weather, bring new lights outside a day before installation to avoid condensation inside the lens. Don’t assume all fixtures are fully weatherproof: check ratings and add a bead of silicone caulk around connectors in rainy climates. Planning and decor inspiration from The Spruce can help you visualize fixture placement before you dig.
Conclusion
A 12V landscape lighting system delivers safety, efficiency, and flexibility that high-voltage alternatives can’t match. The modest upfront cost, straightforward installation, and real energy savings make it the practical choice for homeowners ready to upgrade their outdoor space. Take time to plan your layout, choose quality components, and don’t rush installation. Your efforts will pay off in a well-lit yard that’s functional, attractive, and built to last.


