
Path lighting is one of the highest-impact upgrades a homeowner can make without very costly. It transforms a dark yard into an inviting, safe outdoor space while adding serious curb appeal come nightfall. Whether you’re guiding guests along a garden walkway or lighting the route to your front door, well-placed path lights serve both function and design. The good news: most DIYers can handle path lighting installation in a weekend, and with solar and low-voltage options available, you won’t need an electrician or a major renovation budget. This guide walks you through selecting, installing, and designing path lighting that complements your home’s style while keeping your landscape safe and beautiful.
Table of Contents
ToggleKey Takeaways
- Path outdoor lighting improves both safety and curb appeal by preventing trips on uneven terrain while creating an inviting atmosphere that encourages evening yard use.
- Solar path lights offer the quickest DIY installation with zero wiring required, but low-voltage hardwired systems deliver superior brightness (100–300+ lumens) and reliability over 15+ years for more demanding applications.
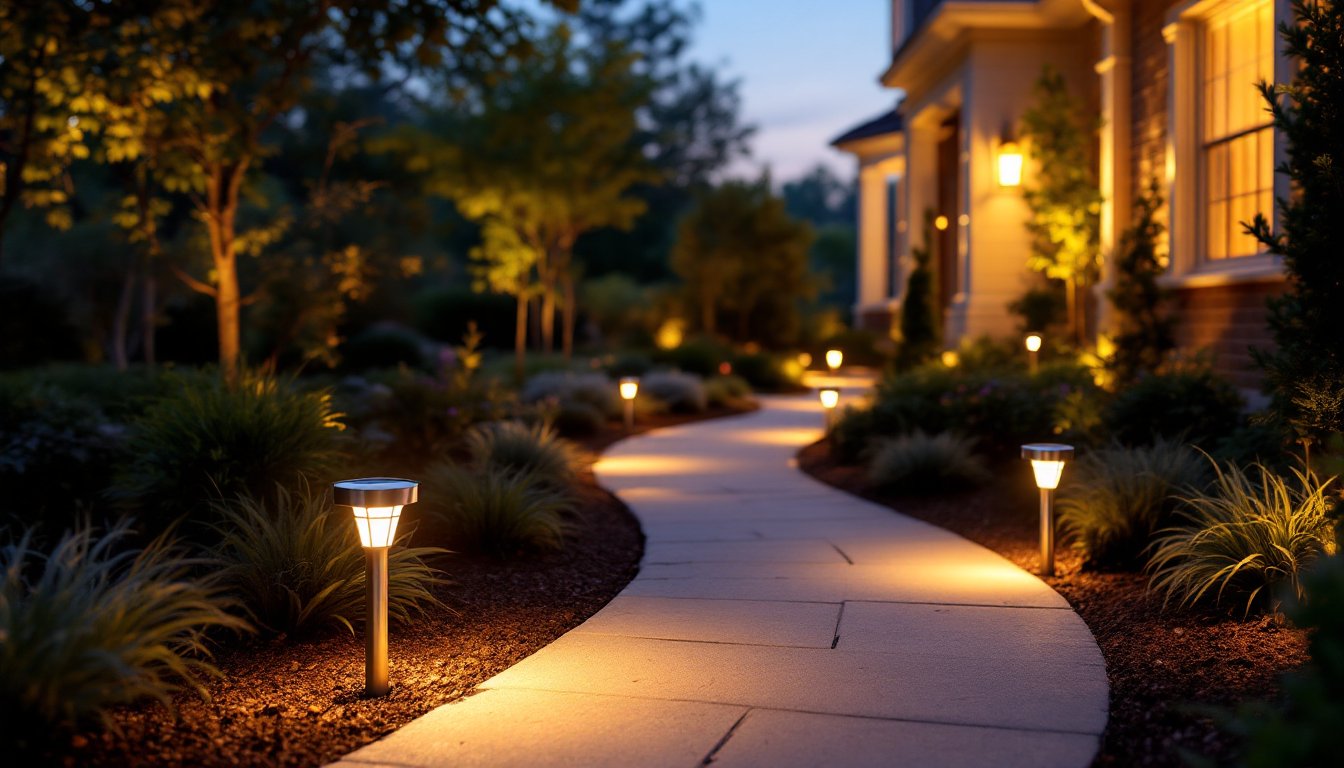
- Proper spacing of 4–6 feet along your path ensures both safety and visual balance while consistent placement around curves and turns creates intentional design rather than accidental appearance.
- Warm white lighting (2700K–3000K) creates a more inviting outdoor space than cool tones, and layering ambient, task, and accent lighting prevents dark patches while adding dimension to your landscape.
- Most path lighting installations take just one weekend for DIYers, with solar options costing $8–$30 per fixture and low-voltage setups running $300–$600 for a modest 6–8 light installation.
- Simple seasonal maintenance like wiping solar panels annually and checking hardwired connections after winter frost ensures your path lighting performs reliably for years.
Why Path Lighting Matters for Your Home
Path lighting serves two essential roles: safety and aesthetics. From a practical standpoint, illuminated walkways prevent trips, falls, and injuries on uneven terrain, especially important if you have elderly family members, young children, or frequently host gatherings after dark. A well-lit path also deters unwanted foot traffic in shadowy corners and makes your property less vulnerable to break-ins.
Beyond safety, path lights shape how visitors and passersby perceive your home. Soft uplighting along a driveway or accent lighting on landscape features creates visual interest and draws the eye toward your home’s best features. Unlike harsh overhead fixtures, path-level lighting feels intimate and inviting. It’s the difference between a house that closes up at sunset and one that welcomes people outside.
Most homeowners who add path lighting report two benefits: they use their yards more in the evening, and their homes feel significantly safer after dark. The investment pays for itself in added confidence and usable space.
Types of Path Lights and How to Choose Them
Your choice of path light type depends on your yard layout, power source preference, and how much light you need. The two main categories, solar and low-voltage hardwired, each have distinct advantages and trade-offs.
Solar-Powered Path Lights
Solar path lights are the quickest, easiest, and cheapest entry point for most DIYers. These freestanding fixtures charge during the day via a small solar panel and illuminate automatically at dusk using a built-in photocell. No wiring, no permits, no electrician needed.
The upside is obvious: zero installation headaches. Stick them in the ground where you want them, and they’re done. Solar lights are also affordable (typically $8–$30 per fixture) and you can move them whenever you like. They work well for informal garden paths, edging around patios, and marking driveway edges.
The downside is brightness and reliability. Most solar path lights deliver 20–100 lumens, enough for subtle accent lighting but not heavy-duty task lighting. On cloudy days or in autumn when daylight is limited, charge time suffers and brightness dims. Batteries degrade after 2–3 years and may need replacement. Also, cheap solar lights are genuinely cheap, plastic housings crack, sensors fail, and you’ll find yourself replacing half of them in a season.
Buy mid-range solar lights (around $15–$20 each) with stainless steel or die-cast aluminum housings. Brands that publish lumen ratings and IP67 waterproofing specs are worth the extra few dollars.
Low-Voltage Hardwired Lights
Low-voltage hardwired path lights use a 12-volt transformer (not standard 120-volt household power) to power multiple fixtures from a single installation point. The transformer plugs into a standard outdoor outlet, and thin, safe cables run through your yard to individual lights. You can install 8–15 fixtures on one circuit, depending on wattage and wire gauge.
Low-voltage setups deliver 100–300+ lumens per fixture and run reliably for 15+ years with proper installation. They’re brighter than solar and more consistent. Since they’re powered, you can add sensors, timers, or dimmers to control them precisely. Aesthetically, they offer more design flexibility, sleek modern bollards, traditional lanterns, or even recessed ground lights.
The trade-off: installation requires more planning and a bit of electrical work. You’ll need to run cable (usually 12-gauge stranded copper for longer runs or 14-gauge for short ones), and that cable must be either buried 6–12 inches deep or threaded through conduit to stay safe and invisible. You’ll also need a GFI outlet (required by code for outdoor circuits) if one doesn’t already exist nearby. Expect to spend $40–$100 per fixture, plus transformer and wiring costs, roughly $300–$600 for a modest 6–8 light path setup.
Compare this head-to-head: solar lights are plug-and-play but dim and short-lived: low-voltage lights demand one afternoon of digging and wiring but reward you with years of bright, reliable performance and design control.
Installation Tips for DIY Success
Proper installation determines whether your path lighting works beautifully for years or turns into a headache by next season. Start by laying out your path with garden stakes and a measuring tape. Mark every 4–6 feet along the path, this is a comfortable spacing for both safety and visual balance. Too dense and the effect feels theatrical: too sparse and you lose the safety benefit.
For solar lights: Place them on a south-facing slope or clearing where they’ll see at least 6 hours of direct sun daily. Avoid shade from trees, fences, or buildings. Push the stake firmly into the ground, twisting it to break the soil, then verify the light stands upright and won’t wobble in the wind. Orient the solar panel to face due south (or a bit toward the west for afternoon sun in summer). That’s it, no tools needed.
For low-voltage hardwired lights: This is more involved but still manageable. First, position your transformer near a weatherproof GFI outlet. Run the cable from the transformer along your marked path, routing it where you want each light. If you’re burying cable, use a flat-blade spade to cut a slit 6–8 inches deep, then tuck the cable into the trench. Cover it with soil, marking the line with paint or a rope so you won’t dig through it later. If you prefer to leave cable visible, run it through black UV-resistant conduit, it blends better than bare wire.
At each light location, strip back the cable sheath (if required by your fixture type), connect the leads to the fixture using the provided terminals or connectors, and secure the light. Use a level or eye it carefully, crooked lights look sloppy. Once all lights are wired, plug in the transformer, test everything at dusk, and adjust your timer if one is present.
Safety essentials: Wear work gloves and eye protection when cutting sod or conduit. If you hit an unmarked utility line while digging, stop immediately and contact 811 (the Call Before You Dig hotline). Don’t bury electrical cable without conduit unless the cable is explicitly rated for direct burial, even low-voltage cable should be protected if it crosses foot traffic zones. Always verify your local code before burying anything: some jurisdictions require licensed installation for low-voltage outdoor circuits.
Lighting Design Ideas to Enhance Your Outdoor Space
Path lighting is just one layer of an effective outdoor lighting scheme. Layering different types of light, ambient, task, and accent, creates depth and interest after dark.
Ambient base layer: Your path lights provide the foundational glow. Supplement them with broader area lights (uplighting trees or the house facade, or softer bollards that wash the ground) to prevent isolated islands of light with dark patches between.
Accent lighting: Highlight focal points. Spotlight a specimen tree, uplight a stone feature wall, or graze a textured fence with low-angle light. These features draw the eye and add dimension. The Spruce has excellent ideas for layering outdoor lighting that balance safety with mood.
Rhythm and pattern: Space lights consistently along curves and corners. Irregular spacing feels accidental, not intentional. If your path winds, place lights on the inside of each turn for visibility and drama. Straight paths can handle regular 4–6-foot intervals or a slightly wider 6–8-foot rhythm if you’re working with lower-output fixtures.
Color temperature matters: Warm white (2700K–3000K) light is inviting and flattering to faces and landscape plants. Cool white (4000K–5000K) is more clinical and can feel harsh near seating areas. For path lighting, stick to warm tones unless you want a modern, minimal aesthetic. Many low-voltage systems and solar lights come in both, so check the package spec.
Using uplighting and silhouetting: Place lights at ground level pointing upward toward shrubs or plantings to create shadows on the house or fence. This adds drama without extra fixtures. Garden design inspiration from Gardenista often showcases how professional landscapers use light to emphasize shape and texture, worth a browse if you want ideas beyond basic path marking.
Maintenance and Seasonal Care
Path lights are low-maintenance, but a few seasonal tasks keep them performing well.
For solar lights: Once per year (spring), wipe dust and debris off the solar panels with a soft cloth and a little water. In fall, after the first hard frost, check that nothing is loosened by freeze-thaw cycles. Replace batteries every 2–3 years (many solar lights use AA or AAA NiMH rechargeables, readily available online). If a light stops working, isolate it by testing with a new battery before replacing the whole unit.
For low-voltage hardwired lights: Check connections after winter frost, ground shifting can loosen wiring. If a fixture dims, check the transformer to ensure the outlet is working and the on/off switch is set correctly. Test the GFI outlet with a multimeter to confirm power delivery. Once per year, inspect the buried cable where it emerges from the ground to make sure animals haven’t chewed through the insulation. If you find damage, cut out the bad section and splice with a weatherproof connector (available at any hardware store).
Winter prep: In cold climates, water in the soil around buried fixtures can freeze and heave them out of position. Push them back into place before snow arrives, or stake them extra securely. If you live where ice builds up, consider removing uplighting and delicate solar fixtures for the season, they’re easy to reinstall in spring.
With these small touches, your path lighting will deliver years of safe, beautiful evenings in your yard. Regional resources like Southern Living’s outdoor living guides often include seasonal care tips specific to different climates, worth a quick search if you’re in a harsh winter zone.


